What is included in this post? So, we learn about IoT Edge… what it is, how it works and running it on a local test instance natively on an Ubuntu Linux, that we want to create, install and configure … jepp, in under 20 minutes.
Video-Alert
If you are lazy to read, simply, go over to youtube and watch the video, I made.
(https://youtu.be/GqU4csA3FTc)
Really, there is neither a special need for… nor a real use case to have an IoT edge solution running on your Mac. But when you’re developing an IoT solution and you are using a Mac with M1 CPU, you should continue reading.
For sure, this here is for learning purposes. I like it very much to broaden my knowledge by just doing experiments with cool technologies.
And this is my requirements and setup for this blog.
I have a Github repository, HalloweenAI , where I am building a face-detection solution based on IoT Edge, that I develop in Github Codespaces.
Codespaces gives me the ability to run a fiddle-free dev environment. But a culprit is, that I don’t have a webcam accessible in Codespaces. Here, UTM, a virtualizer app, comes into play.
To come around, we will run Ubuntu (ARM version) on the Mac and install IoT edge to that instance. By the way, a Mac M-Processor is based on ARM Architecture. … take a moment to think about it… yes, RaspberryPis, Jetson Nanos, and such kinds of hardware are of the same architecture. No, it is not about building an expensive RaspberryPi from your Mac, but preparing an IoT edge solution for it, becomes more attractive. But I don’t want to bore you with too many words, Let’s dive into it.
I like to develop IoT solutions with Microsofts IoT Edge very much because it has great flexibility and it can be easily extended.
Before starting to explain IoT Edge, we should talk in short about IoT Hub – another IoT product from Microsoft, that lives in Azure.
IoT Hub
IoT Hub is a solution, that’s purpose is in general, to be an IoT-Endpoint with capabilities for provision devices, managing states, syncing twins, collecting telemetry data, and many other things, that IoT solution often needs.

You can easily connect devices to it, that are of different types and complexity, like robots, RasPis or just Microcontrollers.
One of the benefits of IoT Hub is, that you can make Cloud services part of your iot solution by just including them.
IoT Edge
So now I’ll come to the point. What is IoT Edge?
The idea behind IoT Edge is, to bring Cloud services to the edge. Means to bring services nearer to, where the client or device is.

There are diverse reasons for this. It could be that there are too often connectivity issues, or it is important, where data should reside, or it is a matter of performance. Nevertheless, with IoT edge you have the option to re-think your Cloud IoT solution.
But it is not only possible to run several Azure Services on the edge, but also third party or your own custom services. And this makes it a smart technology.
IoT Edge components
You can imagine IoT edge as a specialized “operating system” for container services for the IoT use case. That’s why IoT edge ships with three components:

- IoT Edge modules – (the first stack in the picture above) in that component are all the containers, you need for your solution
- IoT Edge runtime – that makes the operational base, like container management and communication between those
- Cloud interface – that enables communication with IoT Hub and allows remote monitoring and remote management
The IoT Edge runtime consists of two modules, that are responsible for running containers and doing the communication.
Here it is IoT edge agent – It instantiates containers, keeps them running, and cares for failures and reports to IoT Hub. The second one is the IoT edge hub – This part, is a kind of local proxy, that behaves like IoT Hub. So clients can work with it, as they would do with Azures IoT Hub … but just in lightweight scope.
Face detection demo application

You can find the demo application code in my GH Repo HalloweenAI. The idea for that project is to make an AI-driven Halloween this year. So I develop a face-detection app, with additional features that allow further scaring of kids :-). To have this running somewhere outside, I want it to run on a device. Here the IoT comes into play. I invite you, to contribute to that project. There are several options and technologies, this project offers, to you. There are modules running in Python, some in C#… some use Flask webserver some ASP.NET Blazor. Also, a PWA version is part of it. But I don’t want to do tease to much, it would break the scope 🙂
Just head over to the part, where the IoT Edge solution gets deployed.

The deployment manifest describes, which modules should be available for the solution and injects the parameters specific for running on the device. I marked the interesting parts yellow. It basically includes the video input source, that is in my case a webcam (/dev/video0). You could also inject a youtube video or a file name, that should be located together with your deployment artifacts.
How to deploy? Just right-click to the deployment-template (marked in the picture above), and select ‘Build and push’ from the context menu. After creating all the container images and pushing them to the ContainerRegistry, there will be a new folder called ‘config’ with a deployment json file, that you can use for deploy to a target. Again, just right-click to it and select ‘Deploy to single device’. After you choose the one, the deployment information will be sent to IoT Hub. We are nearly done… nearly 🙂
Preparing Mac with a local Ubuntu instance
Now it is time for installing UTM. You can get it from the UTM-Website here. This is a virtual machine host, that runs many Operating systems for free. It is based on QEMU. One of the benefits of it, is the ability to run Windows, Linux, or whatever runs natively on ARM. You will see, that our Linux, which we in short install runs smoothly, as it would when booting directly into it. Let’s go and be reminded… under 20 minutes!
After installing UTM, you can start and click on the plus symbol on the top of the window. Now you can choose to either go to the VM marketplace or use your own *.ISO file.
I did it already and therefore can browse for the *.ISO file.
My machine should have 4 cores, what is the size you can find on several RaspberryPis. The memory stays at default for me … put it to your requirements. So keeping the rest at default, I just start now the installation of ubuntu by clicking to the big “start” symbol, like below in the animation.

With selecting to install Ubuntu, you will be led through the installation and configuration process.
I set my machine according to my needs, which means, that I configure a german keyboard.
I also activate OpenSSH for ssh’ing into my machine. Leave the rest as default and go further until installation and configuration are complete.
Install IoT Edge
It’s time for getting IoT Edge running. And really it is not hard to get things done! Microsoft did a good job in putting all details on paper or at least to https://docs.microsoft.com/
Open the link here to head over to the installation guide: Create and provision an IoT Edge device on Linux using symmetric keys – Azure IoT Edge | Microsoft Docs
And really, it is pretty simple, to copy and paste each step into your terminal. I will not repeat the steps in that post.
For configuring our IoT Edge instance as the device, that I previously sent my deployment to, I have to grab the device connection from the Device Twin from IoT Hub. You can either go to the Azure Portal and navigate through your resources or go to your dev env – mine is codespaces here – and grab the details from there if you set it up with Azure IoT Tools.
After being installed, IoT edge immediately gets the deployment configuration and start setting itself up. Now, I expect an error, because I don’t have access to the webcam, that I defined as input for my IoT edge solution.

I’ll go and fix it… !
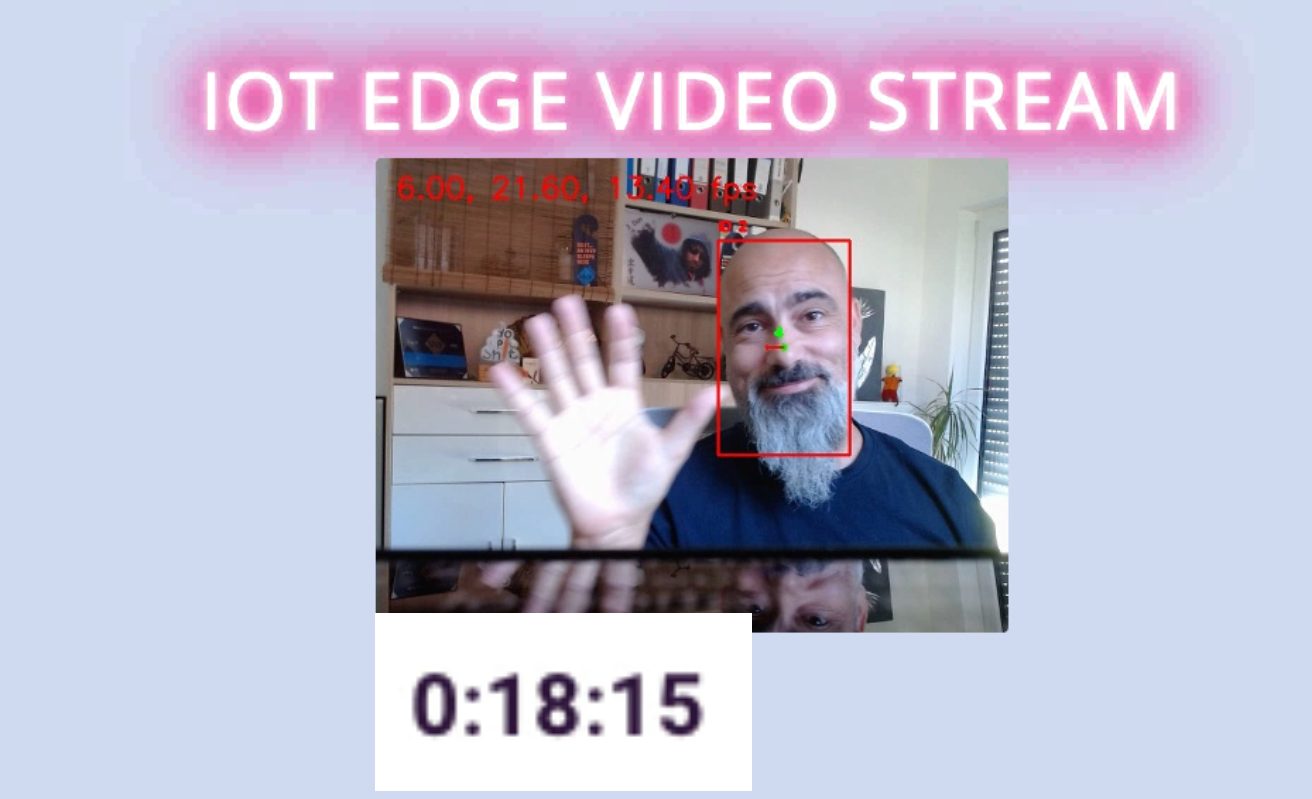
Plugging my cam into the USB Port and passing it through to the virtual machine, let’s me happily, open up the website, my IoT edge solution provides…


So, that’s all. We have done the job in under 20 minutes. You don’t believe it? Then check my video on Youtube.
If you have any comments leave them below. I also would be happy, to welcome you as a contributor to my Github repo HalloweenAI.