Recap
We started with an overview of the Post-Auto project and the cutting-edge technologies I mentioned in the project. Then we got to know the Custom Vision API, with which we trained Post-Auto, and the containerization of the ML model to be able to recognize the Post-Auto on a device.
Then we set up the Jetson Nano and created an IoT base with IoT Edge/ -Hub. In the last article, we looked at the IoT Edge solution in detail. Now the soul of the whole thing is missing – the code (here again the link to the repo). So let’s finish the last part of this series!
The general program flow
So how does the software work? Let’s look at the components used.

All these modules in the picture above are components of the container YoloModule. The main.py serves as an entry point. In Main different parameters (DetectionSampleRate, Inferencing-Boolean, Video-Source,…) are passed from outside and the IoTHub accesses are instantiated with the HubManager. Also from here, the module VideoCapture is provided with different parameters from outside. It is used to address the transferred video source.
The VideoCapture module creates an instance of the Videostream module to split the video source into frames. These frames are then passed to an instance of DetectAndTrack.
DetectAndTrack is the core of the YoloModule. It processes the passed frame with object detection and performs object tracking. For the detection, the module YoloInference is used, with which the individual objects are recognized. YoloInference does the actual work regarding “AI”. Furthermore in DetectAndTrack metadata is written/drawn into the frame and a message is sent to the IoTHub via the HubManager.

Video! You can’t do it without pictures
Let’s start at the beginning. First, we need images that we can analyze. For this purpose, I have included several possible sources in my solution. A webcam, an RTSP video stream, a single image download, a Youtube download, and even a HoloLens can be tapped.
The interesting code can be found at /modules/YoloModule/app. For video processing, you can have a look at the file VideoCapture.py and VideoStream.py. These, as the names already indicate, are the modules VideoCapture and VideoStream.
VideoCapture makes the video source, which was entered via external parameters, available and prepares it for the module VideoStream. In the following code, you can read the different sources.
    def setVideoSource(self, newVideoPath):

        if self.captureInProgress:
            self.captureInProgress = False
            time.sleep(1.0)
            if self.vCapture:
                self.vCapture.release()
                self.vCapture = None
            elif self.vStream:
                self.vStream.stop()
                self.vStream = None
            elif self.imageResp:
                self.imageResp.close()
                self.imageResp = None

        if self.__IsRtsp (newVideoPath):
            print(""r"">RTSP Video Source")

            self.useStream = True
            self.useStreamHttp = False
            self.useMovieFile = False
            self.videoPath = newVideoPath

            if self.vStream:
                self.vStream.start()
                self.vStream = None

            if self.vCapture:
                self.vCapture.release()
                self.vCapture = None

            self.vStream = VideoStream(newVideoPath).start()
            Needed to load at least one frame into the VideoStream class
            time.sleep(1.0)
            self.captureInProgress = True

        elif self.__IsHttp (newVideoPath):
            print("IsHttp")
            Use urllib to get the image and convert into a cv2 usable format
            self.url = newVideoPath
            self.useStreamHttp = True
            self.useStream = False
            self.useMovieFile = False
            self.captureInProgress = True

        elif self.__IsYoutube (newVideoPath):
            print("""""YouTube Video Source")
            self.useStream = False
            self.useStreamHttp = False
            self.useMovieFile = True
            This is video file
            self.downloadVideo(newVideoPath)
            self.videoPath = newVideoPath
            if self.vCapture.isOpened():
                self.captureInProgress = True
            Else:
                print (
                    "================================================================================================================================================================================================================================================================================================================================================================================================================================================================================================================================

        elif self.__IsCaptureDev (newVideoPath):
            print("===> Webcam Video Source")
            if self.vStream:
                self.vStream.start()
                self.vStream = None

            if self.vCapture:
                self.vCapture.release()
                self.vCapture = None

            self.videoPath = newVideoPath
            self.useMovieFile = False
            self.useStream = False
            self.useStreamHttp = False
            self.vCapture = cv2. VideoCapture(newVideoPath)
            if self.vCapture.isOpened():
                self.captureInProgress = True
            Else:
                print (
                    "================================================================================================================================================================================================================================================================================================================================================================================================================================================================================================================================
        Else:
            print (
                "==================================================================================================================================================================================================================================================================================================================================================================================================================================================================================================
            self.useStream = False
            self.useYouTube = False
            self.vCapture = None
            self.vStream = None
        return self
After VideoCapture has passed the source to VideoStream, the video source is opened and the stream is returned to VideoCapture if a video source provides a stream. For Youtube videos, for example, it behaves somewhat differently (see line 365). The VideoCapture module downloads the video. The images are then pre-processed accordingly. For example, if they are too large, they are scaled-down and the frames are calculated per second (FPS).
In any case, the individual frames are then processed in a loop.
        detectionTracker = DetectAndTrack(self.detectionSampleRate, self.confidenceLevel, self.imageProcessingEndpoint, self.yoloInference)
        while True:

            Get current time before we capture a frame
            tFrameStart = time.time()
            detectionTracker.SKIP_FRAMES = self.detectionSampleRate

...
            Try:
                Read a frame
                if self.useStream:
                    Timeout after 10s
                    signal.alarm(10)
                    frame = self.vStream.read()
                    signal.alarm(0)

                elif self.useStreamHttp:
                    self.imageResp = urllib2.urlopen(self.url)
                    imgNp = np.array(bytearray(self.imageResp.read()),dtype=np.uint8)
                    frame = cv2.imdecode(imgNp,-1)

                Else:
                    frame = self.vCapture.read()[1]
            Exception as e:
                print("ERROR : Exception during capturing")
                raise(s)

            Resize frame if flagged
            if needResizeFrame:
                frame = cv2.resize(frame, (self.videoW, self.videoH))
In line 1 the DetectAndTrack module is instantiated. Line 2 is the beginning of the loop – an endless loop. Lines 5, 6 and following calculate the FPS. In lines 20, 23 we finally get the frame, which we then reduce in line 30 if necessary.
For graphical operations, I use OpenCV. You can see that by using the module instance cv2 (e.g. cv2.resize(…) ).
Object detection & tracking
For each frame, the DetectAndTrack module is called. This module keeps a list of already known (detected) objects and performs object detection to detect new objects in an image.
A core problem that this module should solve is the fact that one detected object per frame, in our imagination, does not necessarily have to be a “new” object.
Let’s assume that a small black car drives into the image. Then we as humans understand “new object (car)”. But since we don’t distinguish in frames, we still expect the same little black car to be there when it has moved a few “pixels” further in the picture.
If the computer makes an object detection at this point, there are always new little black cars. This is not a problem at first if we didn’t want to process it very much (for example counting). But in order for me to be able to evaluate connections, directions or the number of different cars, the device must understand this. This is where tracking comes into play. The program logic must now “understand” that one object in the first frame is the “same” object in the next frame. Let’s now look at the code.
            Run Object Detection -- GUARD
            if self.inference:
                #yoloDetections = self.yoloInference.runInference(frame, frameW, frameH, self.confidenceLevel)
                detectionTracker.doStuff(frame, frameW, frameH)

            Calculate FPS
            timeElapsedInMs = (time.time() - tFrameStart) * 1000
            currentFPS = 1000.0 / timeElapsedInMs

            if (currentFPS > cameraFPS):
                Cannot go faster than Camera's FPS
                currentFPS = cameraFPS

            Add FPS Text to the frame
...
            self.displayFrame = cv2.imencode('.jpg', frame)[1].tobytes()

            timeElapsedInMs = (time.time() - tFrameStart) * 1000

...
Line 35: The DetectAndTrack module is called with the method doStuff(frame, Width, Height). The frame is passed by reference, so we can assume that we continue working with the result frame from line 45 (comment). I left out the code parts that insert text etc. into the image for clarity (… marked omission). But now let’s have a look at the DetectAndTrack module.
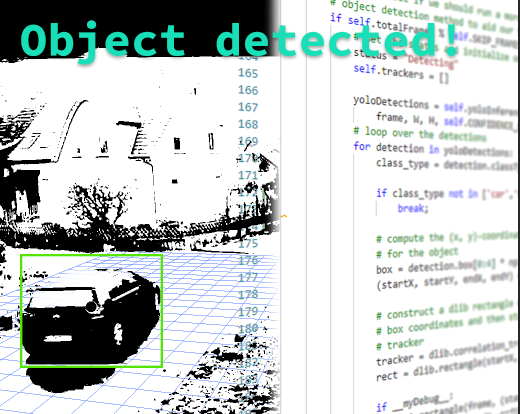
        if self.totalFrames % self. SKIP_FRAMES == 0:
            set the status and initialize our new set of object trackers
            status = "Detecting"
            self.trackers =[]

            yoloDetections = self.yoloInference.runInference(
                frame, W, H, self. CONFIDENCE_LIMIT)
            loop over the detections
            for detection in yoloDetections:
                class_type = detection.classType

                if class_type not in ['car','truck','person', 'bicycle','motorbike','bus','bird','cat','dog','umbrella']:
                    break;

                compute the (x, y)-coordinates of the bounding box
                For the object
                box = detection.box[0:4] * np.array([1, 1, 1, 1])
                (startX, startY, endX, endY) = box.astype("int")

                Construct a dlib object from the bounding
                box coordinates and then start the dlib correlation
                • tracker
                tracker = dlib.correlation_tracker()
                rect = dlib.rectangle(startX, startY, endX, endY)

                if __myDebug__:
                    cv2.rectangle(frame, (startX, startY),
                                  (endX, endY), (0, 0, 0), 1)
                    cv2.putText(frame, class_type, (startX, startY),
                                cv2. FONT_HERSHEY_SIMPLEX, 0.5, (0, 255, 0), 2)

                tracker.start_track(rgb, rect)

                container = TrackerExt(class_type, tracker, (startX, startY, endX, endY))

                Add the tracker to our list of trackers so we can
                • utilize it during skip frames
                self.trackers.append(container)
The If-statement in line 1 is only executed at every Nth frame. This saves valuable resources. Because within the If-statement the Object detection is applied (line 6 to the YoloInference Module). Inferencing an ML model requires quite a bit of performance. If you want to know something about the ML model, then read on below about Yolo.
After querying the ML model, we get 0 to x objects back. One element of this list has the following interesting content for us.
- ClassName – Type of the object (car, person, …)
- probability – detection reliability in percent
- boundingBoy – a rectangle that marks the object in the frame/image
From this list, we are only interested in a small part of types. Using the For loop in line 9, we iterate over the individual detected objects and check whether they fit into our area of interest (line 12). If so, we get the corresponding bounding box in line 17 and add it to an object tracker (lines 23 – 38). More about the tracker here.
What about the intermediate frames? Those frames for which no object detection is done? The following code shows this. Let’s assume that object detection is already running, then we already have an object in our tracking list (see above line 38). So now we have to iterate over the objects in the list to be tracked.
        Else:
            loop over the trackers
            for trackerContainer in self.trackers:
                set the status of our system to be 'tracking' rather
                • than 'waiting' or 'detecting'
                status = "Tracking"
                tracker = trackerContainer.tracker

                update the tracker and grab the updated position
                tracker.update(rgb)
                pos = tracker.get_position()

                unpack the position object
                startX = int(pos.left())
                startY = int(pos.top())
                endX = int(pos.right())
                endY = int(pos.bottom())

                trackerContainer.rect = (startX, startY, endX, endY)

                if __myDebug__:
                    cv2.rectangle(frame, (startX, startY),
                                  (endX, endY), (0, 0, 0), 2)
                    cv2.putText(frame, trackerContainer.class_type, (startX, startY),
                                cv2. FONT_HERSHEY_SIMPLEX, 0.5, (0, 255, 0), 2)
Line 3 starts the iteration. The dlib module does the tracking for us. That means we just have to put the current frame into the tracker and call the method update (line 10). This gives us the new coordinates of the already recognized object (line 11). With the newly obtained position data, we can update the current element in the tracking list (line 19).
Now that the two cases of detection/tracking have been dealt with in the respective For loops, we can now start with the logic for the Postbus and others. Let’s take a look at the lines of code reduced to what is important for us.
        extractedRects = [
            trackerContainer for trackerContainer in self.trackers]

        objects = self.ct.update(extractedRects)
In line 1 and 2 I get a list of separate tracking-container objects. These contain the ID of an object and its coordinates. This list is passed to a Centroid tracker in line 4.
Centroids are “centers”. This means the reduction of an object marked by a rectangle to its center.


The Centroidtracker creates new Centroids or updates existing ones with the new coordinates from the update via the dlib-Tracker (above). Back there is a list of objects with their respective ID and corresponding centroids (also line 4).
        loop over the tracked objects
        for (objectID, centroidTrackerData) in objects.items():
            Check to see if a trackable object exists for the current
            object ID
            to = self.trackableObjects.get(objectID, None)

            centroid = centroidTrackerData[0]
            className = centroidTrackerData[1]
            rect = centroidTrackerData[2]

            directionX = 0
            directionY = 0

            If there is no existing trackable object, create one
            if to is None:
Next, all objects are iterated over (from line 2). Within this loop, it is basically queried whether the current object is a newly detected object or already tracked. With line 5 a lookup is made in the list and the result (line 15) is checked for presence/absence.
                clipped = clipImage(origFrame, rect)

                if className == 'car' or className == 'truck':
                    details = self.__getCarDetails__(clipped)
                    if details and len(details) > 0:
                        predictions = details["predictions"]
                        Try:
                            isPost = next((match for match in predictions if float(
                                match["probability"]) > 0.7 and match["tagName"] == "Postauto"), None)
                        Except GeneratorExit:
                            Pass
                        if isPost:
                            className = "postcar"
                            messageIoTHub = IoTHubMessage(""""Name":"Postauto"""")
                            AppState.HubManager.send_event_to_output("output2", messageIoTHub, 0)
If the object is not in the list, the following operations are performed.
In line 1, the area with the detected object is “cut out” from the current frame. This is how I have illustrated the process:

If to is None:The type of the object of the current iteration is checked for “car” or “truck” (line 3). As far as the object is recognized as truck or car, the second ML model (the one we created with the Custom Vision API – you can read it again here) is queried with the image section. With line 4 the next step ML-model query starts. The clipped image is passed to the __getCarDetails__ method. Within this method a REST call is then made to another IoT Edge module – the PostcarDetector Module.
This module is a web service that listens on a port set in the deployment configuration. In my solution it is port 80, which I can always access within my IoT Edge. The module gets a Base64 encoded byte package (image) when called (see list below). This is the unmodified Python file that you got from the CustomVision API as export if you had run through this tutorial.
# Like the CustomVision.ai Prediction service /image route handles either
#     - octet-stream image file
#     - a multipart/form-data with files in the imageData parameter
@app.route('/image', methods=['POST'])
@app.route('/<project>/image', methods=['POST'])
@app.route('/<project>/image/nostore', methods=['POST'])
@app.route('/<project>/classify/iterations/<publishedName>/image', methods=['POST'])
@app.route('/<project>/classify/iterations/<publishedName>/image/nostore', methods=['POST'])
@app.route('/<project>/detect/iterations/<publishedName>/image', methods=['POST'])
@app.route('/<project>/detect/iterations/<publishedName>/image/nostore', methods=['POST'])
def predict_image_handler(project=None, publishedName=None):
    try:
        imageData = None
        if ('imageData' in request.files):
            imageData = request.files['imageData']
        elif ('imageData' in request.form):
            imageData = request.form['imageData']
        else:
            imageData = io.BytesIO(request.get_data())

        img = Image.open(imageData)
        results = predict_image(img)
        return jsonify(results)
    except Exception as e:
        print('EXCEPTION:', str(e))
        return 'Error processing image', 500
The next lines perform the classification by Postbus versus Non-Postbus and assemble a Result-JSON, which can then be returned.
def predict_image(image):
    log_msg('Predicting image')

    w, h = image.size
    log_msg("Image size: {}x{}".format(w, h))

    predictions = od_model.predict_image(image)

    response = {
        'id': '',
        'project': '',
        'iteration': '',
        'created': datetime.utcnow().isoformat(),
        'predictions': predictions }
I decided against an object-detection, which I had already built before with the CustomVision API because the export files were very not designed to be performant. Since the image is resized and clipped in different FOR-loops, a lot of CPU time is needed. I had started to rewrite everything with OpenCV to get a bit more performance out of it, but I soon decided to let it go, because the approach is generally not very nice. Without further ado I turned an object detection approach into a classification approach. Now there are not so much resources needed anymore and system can run more fluent.
How did it work out? With the object detection approach, I always had a query latency of about 15 seconds. Dumb, if I had to check every car for post buses. With the classification approach, it needs only 1 – 2 seconds, which is a much better solution.
  isPost = next((match for match in predictions if float(
                                match["probability"]) > 0.7 and match["tagName"] == "Postauto"), None)
                        except GeneratorExit:
                            pass
                        if isPost:
                            className = "postcar"
                            messageIoTHub = IoTHubMessage("""{"Name":"Postauto"}""")
                            AppState.HubManager.send_event_to_output("output2", messageIoTHub, 0)
The PostcarDetector module now returns a JSON object to the caller, the DetectAndTrack module, which contains a list of possible detected object types (“predictions”). The construct in line 8 returns the first object from the predictions list that was detected as a postcar with a minimum probability of 70%, or nothing. Line 12 checks for it. Line 15 sends a corresponding message via the HubManager to the EdgeHub at Output 2.
Short lookup into the Deployment Config to understand the effect of this message.
Lines 5 and 6 in the Deployment Config extract below describe routes. Line 6 is an important one for us because it defines Output2. Everything that is sent to Output2 is automatically available as input to the SpeechModule. Or the other way round… the SpeechModule is only interested in messages from Output2 of the YoloModule.
    "$edgeHub":
      "properties.desired":
        "schemaVersion": "1.0",
        "routes":
          "YoloModuleToIoTHub": "FROM /messages/modules/YoloModule/outputs/output1 INTO $upstream",
          "YoloModuleToSpeechModule": "FROM /messages/modules/YoloModule/outputs/output2 INTO BrokeredEndpoint("/modules/SpeechModule/inputs/input1")"
        },
        "storeAndForwardConfiguration":
          "timeToLiveSecs": 7200
        }
      }
Ok, continue in context. Let’s look at what happens after checking for “car” or “truck”.
                self.__saveToBlobStorage(clipped, id=objectID, typeName=className)
                fullName = className +"-full"
                clipped = clipImage(origFrame, [0,0,W,H])
                self.__saveToBlobStorage(clipped, id=objectID, typeName=fullName)
The cropped image is stored in the local blob storage with its objectId and type (it can also be something other than a car) (line 1). Yes, Azure Blob Storage! Another ingenious thing that is available with IoT Edge. Blob storage that also has an automatic upload to the cloud. So I don’t have to worry about copying the image data by hand and then programming the failure procedure. Everything comes with the container. In Azure, you can do a lot of great things with it (I’ll be happy to write a separate article about this at 🙂 ).
After saving the small picture section, I also save the whole picture. This looks a bit strange in line 3. I cut out of the frame again with the method clipImage(origFrame, [0,0,W,H]). Only this time over the whole size. I do this because I cannot work on the original frame for the processing in the method and create a copy quite fast. This is very fast in Python because I take advantage of the fact that the image is a NumPy array and I only transfer the rows and columns I am interested in another array.
                to = TrackableObject(objectID, className, centroid)
                self.__sendToIoTHub__(to, rect, frame)
The next lines now assign a new TrackingObject, which will be added to the general list of objects to track. Line 2 sends a general message to the IoT Hub with the facts about the new object. (Note: This message is then processed in Timeseries Insights so that you can log events in the area over time – as in the next screenshot)

After looking at what happens when an object is newly detected, we are certainly interested in what happens to objects that have already been detected. For my use case, I decided to evaluate the direction of an object. This allows me to determine whether, for example, the post bus is passing my property or actually has something for me. It also allows me to determine the relative speed of an object and much more.
           Otherwise, there is a trackable object so we can utilize it
            • to determine direction
            Else:
                • the difference between the y-coordinate of the *current*
                centroid and the mean of *previous* centroids will tell
                - us in which direction the object is moving (negative for
                'up' and positive for 'down')
                y =[c[1] for c in to.centroids]
                x =[c[0] for c in to.centroids]

                directionY = centroid[1] - np.mean(y)
                directionX = centroid[0] - np.mean(x)

                if len(to.centroids)>=200:
                    temp = to.centroids[:len(to.centroids)-2]
                    to.centroids = temp
                to.centroids.append(centroid)

            Store the trackable object in our dictionary
            self.trackableObjects[objectID] = to

            Draw both the ID of the object and the centroid of the
            Object on the output frame
            text = "A:"-----------------------------------------------------------------------------------------------------------------------
            cv2.putText(frame, text, (centroid[0] - 10, centroid[1] - 10),cv2. FONT_HERSHEY_SIMPLEX, 0.5, (0, 255, 0), 2)
            cv2.circle(frame, (centroid[0], centroid[1]), 4, (20, 250, 130), -1)
First, we take all y and x values of all centroids since recognition of the object (t0) until last (t-now – 1) in line 8. Then we average all y and x values. This is simple vector mathematics. We subtract this average from the respective X and Y values of the current centroid in lines 11 and 12. Now we get a vector that gives the approximate direction based on the past (last known centroid to the current one).

Since it can happen that an object does not move, for example, because a car has been parked, the memory of the Jetson Nano would be somewhat strained if all historical object centroids were stored. Therefore I delete the history in lines 14 to 15 if I have more than 200 entries. In practice, this value has proven itself in my case. I then add the current centroid to the list with all remaining centroids (line 17). With line 20 I update the currently tracked object with the new values. Finally, I paint the following into the picture starting from line 24.

        Increment the total number of frames processed thus far and
        then update the FPS counter
        self.totalFrames += 1
        self.fps.update()
The last lines of the DetectAndTrack module perform an FPS update, which is used in the VideoCapture module.
This takes you back to the VideoCapture Module. Here the FPS are recalculated and written to the current frame (lines 6 to 11 below).
            if self.inference:
                #yoloDetections = self.yoloInference.runInference(frame, frameW, frameH, self.confidenceLevel)
                detectionTracker.doStuff(frame, frameW, frameH)

            Calculate FPS
            timeElapsedInMs = (time.time() - tFrameStart) * 1000
            currentFPS = 1000.0 / timeElapsedInMs

            if (currentFPS > cameraFPS):
                Cannot go faster than Camera's FPS
                currentFPS = cameraFPS

            Add FPS Text to the frame
            cv2.putText(frame, "FPS" + str(round(currentFPS, 1)), (10, int(30 *
                                                                            self.fontScale)), cv2. FONT_HERSHEY_SIMPLEX, self.fontScale, (0, 0, 255), 2)

            self.displayFrame = cv2.imencode('.jpg', frame)[1].tobytes()

            timeElapsedInMs = (time.time() - tFrameStart) * 1000
In line 17 the finished, rendered frame is passed to a property for display in the browser. How does this work? There is a method in the VideoCapture module…
    def get_display_frame(self):
        return self.displayFrame
…which is called by the ImageServer module. This module was started when the VideoCapture module was initialized and has received a reference to it. The following is defined in the ImageServer module:
    def on_message(self, msg):
        if msg == 'next':
            frame = self.videoCapture.get_display_frame()
            if frame != None:
                encoded = base64.b64encode(frame)
                self.write_message(encoded, binary=False)
… and is retrieved with a WebSocket connection via a WebSocketHandler.
As long as a video source delivers images or nothing else goes wrong, we can now detect any objects in a video stream and view the result live in the browser – so we see what the Jetson Nano sees.
Object Detection with YOLO
For the general recognition of objects, I have chosen Yolo (You look only once). It is a very performant (F)CNN (Fully Convolutional Neural Network) network. For the different objects that need to be detected, I decided to use the COCO dataset, because it already knows all objects relevant to me.
To use it in the current solution, I have created a folder with the relevant files. The Coco dataset and labels, the Config (describes the net architecture), weights and the ML model itself.

The module YoloInference is used to address and provide the ML model and inference results. Since I use the Darknet variant, I import of course the Python Darknet module, as well as OpenCV and the YoloDetection module.
from darknet import darknet

import cv2
import numpy as np
import time
import os
import json
from datetime import datetime
import YoloDetection
from YoloDetection import YoloDetection

...

yolocfg = r'yolo/yolov3-tiny.cfg'
yoloweight = r'yolo/yolov3-tiny.weights'
classesFile = r'yolo/coco.names'
dataFile = r'yolo/coco.data'
Furthermore, I declare the yolo-relevant files (lines 14 – 17). The module YoloDetection serves here only as DTO (Data transfer object).
Because now a lot of code is coming, which takes care of addressing the ML model and providing the result data, I would like to dispense with the line analysis at this point and instead focus on the places that are interesting for the whole construct.
Inferencing is a resource-hungry task, which can also lead to latencies on the Jetson Nano very quickly. That means for the implementation you should remember to set up everything GPU-based in order to use the performance of the hardware.
Since everything will run in a container, you will need access to the GPU from there. You can do this in the Deployment Config for the IoT Edge solution. The parameterization is done from line 68 to 77 and the hardware binding for the container from line 79 to 125.
"YoloModule":
            "version": "1.5.$BUILD_VERSION_YOLO",
            "type": "docker",
            "status": "running",
            "restartPolicy": "always",
            "settings":
              "image": "AMODULES. YoloModule.arm64v8","
              "createOptions":
                "Env": [
                  "VIDEO_PATH=$CONTAINER_VIDEO_SOURCE,"
                  "VIDEO_WIDTH=640",
                  "VIDEO_HEIGHT=480",
                  "FONT_SCALE=0.8",
                  "NOIOTHUB=False",
                  "DETECTION_SAMPLE_RATE=10",
                  "CONFIDENCE_LEVEL=0.3",
                  "IMAGE_PROCESSING_ENDPOINT=http://postcarmodule/image"
                ],
                "HostConfig":
                  "Devices": [
                    {
                      "PathOnHost": "/dev/nvhost-ctrl",
                      "PathInContainer":"/dev/nvhost-ctrl",
                      "CgroupPermissions":"rwm"
                    },
                    {
                      "PathOnHost": "/dev/nvhost-ctrl-gpu",
                      "PathInContainer":"dev/nvhost-ctrl-gpu",
                      "CgroupPermissions":"rwm"
                    },
                    {
                      "PathOnHost": "/dev/nvhost-prof-gpu",
                      "PathInContainer":"dev/nvhost-prof-gpu ",
                      "CgroupPermissions":"rwm"
                    },
                    {
                      "PathOnHost": "/dev/nvmap",
                      "PathInContainer":"/dev/nvmap",
                      "CgroupPermissions":"rwm"
                    },
                    {
                      "PathOnHost": "dev/nvhost-gpu",
                      "PathInContainer":"dev/nvhost-gpu,"
                      "CgroupPermissions":"rwm"
                    },
                    {
                      "PathOnHost": "/dev/nvhost-as-gpu",
                      "PathInContainer":"/dev/nvhost-as-gpu",
                      "CgroupPermissions":"rwm"
                    },
                    {
                      "PathOnHost": "/dev/nvhost-vic",
                      "PathInContainer":"/dev/nvhost-vic",
                      "CgroupPermissions":"rwm"
                    },
                    {
                      "PathOnHost": "/dev/tegra_dc_ctrl",
                      "PathInContainer":"/dev/tegra_dc_ctrl",
                      "CgroupPermissions":"rwm"
                    },
                    {
                       "PathOnHost": "/dev/video0",
                       PathInContainer":"/dev/video0,"
                       "CgroupPermissions":"rwm"
                    }
                  ],
                  "PortBindings":
                    "80/tcp": [
                      {
                        "HostPort": "8080"
                      }
                    ]
                  }
                }
              }
            }
The libraries should be compiled for GPU support. If you don’t want to do everything yourself, it’s only useful if someone has already done the necessary steps at that point. Let’s have a look at what I mean – the docker file. It assembles the whole YoloModule and makes it run on the Jetson Nano.
FROM iotcontainertt.azurecr.io/iot-sdk-python-builder:arm64v8 as iot-sdk-python-builder

FROM toolboc/jetson-nano-l4t-cuda-cudnn-opencv-darknet as cuda-opencv-darknet

WORKDIR /app

RUN apt-get update &&
    DEBIAN_FRONTEND=noninteractive apt-get install -y --no-install-recommends
     wget
     libcurl4-openssl-dev
     python3-pip
     libboost-python-dev
     libgtk2.0-dev
     libblas-dev
     liblapack-dev
     libatlas-base-dev
     gfortran
     python3-setuptools python3-numpy python3-opencv python-opencv &&
    rm -rf /var/lib/apt/lists/*
Line 1 provides the base image for the IoTHub SDK. I created it as a separate image because the build process took too long after several builds. Also, it is quite good to store “static” things – things that don’t need to change anymore. The base image of my iot-sdk-python-builder:arm64v8 image is based on the balenalib/jetson-tx2-ubuntu:bionic base image.
Line 3 is the most important line when it comes to getting Darknet’s yolo inferencing to work on a GPU. The friendly way you can find an image in the repositories of “toolboc” that has GPU, OpenCV and darknet precompiled and provided for use on the Jetson Nano.
After that (lines 7 – 19) the system is prepared with all necessary modules and libs that are important for working with the YoloModule app.
COPY --from=iot-sdk-python-builder /usr/sdk/src/device/doc/package-readme.md /src/device/doc/package-readme.md
COPY --from=iot-sdk-python-builder /usr/sdk/src/build_all/linux/release_device_client /src/build_all/linux/release_device_client
RUN cd /src/build_all/linux/release_device_client && python3 setup.py install
COPY --from=iot-sdk-python-builder /usr/sdk/src/device/samples/iothub_client.so /app/iothub_client.so

RUN cp /usr/local/src/darknet/libdarknet.so /app/libdarknet.so
All the lines copy only the binaries from the IoT SDK base image and the darknet lib to the current image (because of multistage builds).
COPY /build/requirements.txt ./
COPY /build/pip-cache/* /root/.cache/pip/
Line 28 is for inserting the dependent modules in the Python application. The Requirements.txt contains the following import modules: requests, json, pickle, netifaces
Which will be installed later via pip. This is a regular procedure. Of course, you could have written pip install... as a line directly but then, if the line would be changed, the whole build process would be restarted with pip install … instead of just installing the relevant modules. This way, only if a package in requirements.txt really changes, it will be rebuilt (check the hash comparison at “docker build”).
In line 29 I copy the different wheels because a few lines later very time-consuming compilations would run. It took me a few tries to understand… My primary build system is a Win 10 on an amd64 PC. So compiling takes more overhead time to build for the right target architecture than running it directly on the target architecture (Jetson Nano). I needed 4-6h for the pip install imuitils for example. But I didn’t want to develop everything on the Nano all the time, so I did the pip install once on the device and then copied the folder “/root/.cache/pip” to my build folder of the development solution (be careful that Windows doesn’t start to change the encodings, then it won’t run on Linux anymore).

RUN pip3 install --upgrade pip

RUN pip3 install tornado==4.5.3
    trollius
    scipy==1.3.1 numpy==1.13.3
RUN pip3 install /root/.cache/pip/dlib-19.18.0-cp36-cp36m-linux_aarch64.whl
RUN pip3 install /root/.cache/pip/imutils-0.5.3-py3-none-any.whl
From line 31 on, the pip-installs are started. Since I spent quite some time to speed up the build process, the docker file is now a bit “fragmented”. I could now write the modules in lines 33-35 back into the requirements.txt file and reduce three lines of docker file, which also has a positive effect on the layer count of the image. I had originally built the modules one by one to find out what made the process so sluggish.
Lines 36/37 show the result of my research. Here I installed the two modules dlib and imutils from the finished wheel, so now a few minutes installation in the worst case.
RUN apt-get update &&
    apt-get install -y --no-install-recommends zip pandoc &&
    rm -rf /var/lib/apt/lists/*

RUN git clone --depth=1 https://github.com/ytdl-org/youtube-dl.git &
    cd youtube-dl &&
    make & &
    make install
Lines 39 – 46 now prepare the packages for Youtube video handling. The YoloModule app can, as a reminder, also use Youtube videos as a video source, which works really well in tests.
RUN pip3 install -v -r requirements.txt
RUN apt-get update && apt-get install -y --no-install-recommends libffi-dev libssl-dev python-openssl
RUN pip3 install azure-storage-blob
The next step is to install all modules listed in the requirements.txt by pip (line 48). The libs installed in line 49 are necessary for Azure Blob Storage.
ADD /app/ .


Expose the port
EXPOSE 80

Entrypoint[ "python3", "-u", "./main.py" ]
These lines ultimately serve the Docker Host for deployment. So the container can be reached on port 80 and starts up with Main.py when it is booted.
Object tracking with DLIB
Object tracking is an important part of the solution because, as I have already explained above, otherwise no object identity can be created and performance is significantly increased by tracking.
For my solution, I decided to use a state of the art tracker, which you get from the DLIB library. The object tracker in it is a correlation tracker and works roughly described like this.
An object moves only slightly from frame to frame, so if it is selected, the “positions” of the object in the frames can be easily correlated. This means that distinctive image properties that were selected in a previous frame can be quickly found in the following frame.
The human brain can do this with ease, but it works the same way. Imagine you are shown two bananas. One is unmarked, the other has a small brown spot. Of course, you could find them in a bunch of other bananas.

In this picture, two frames are shown. In the upper left is the input frame, which passes a marked object to the tracker. This forms a kind of “map” (conversion of time to frequency – Fourier is our friend) over several features (image properties). This makes it easier to distinguish an object from noise and the like. The next frame is also converted, where the correlating features can be found and marked. That is already everything. Of course, there is no magic behind it but a lot of mathematics. If you want to know more about it, have a look here. The MOSSE approach is the basis here.
Finally
With this video, I would like to conclude this article. I hope it will be exciting for you to get to know the aspects of this solution better. I had a lot of fun dealing with all these techniques. Likewise, I now feel that I have found many new approaches to other problems that I can develop further.
While writing this article, however, I also noticed how much I can/must still design and optimize this solution 🙂
If you have read all parts of this series and have not yet written comment, I would be very happy if you would leave one now. If you liked a contribution especially, please give me a Like or forward it to interested people – I would be very happy.
At this point, I would like to look back together with you and write together what we have looked at.
- Azure
- Custom Vision API
- Container Export of an ML Model
- Docker
- Hardware Jetson Nano
- VSCode Extensions with Azure and IoT
- IoT Hub / IoT Edge Solution
- IoT Edge Module Programming
- Python
- Objectdetection with Yolo
- Objecttracking with dlib
- Opencv
- Video streaming with WebSocket
- Videoframe grabbing
- Time Series Insight
- Azure Blob Storage
…and certainly one or two things I haven’t thought about now. That’s quite a list. Maybe you remember. I announced it in my first “Overview” post.
Thanks for reading it! Keep learning and sharing!